Videos!

Added a Video category to the website.  More to come as I increase in proficiency with Premiere Pro, photography/videography techniques in general, and audio recording (for voice-over/vlogging).  My intent is to create timelapse videos for most of my future pieces, tutorials on origami techniques, updates/vlogs, and some personal videos, such as the bouldering videos.  If you have any particular topics/techniques that you'd like to see me cover, let me know!

Aspects

This series of five pieces was conceived as a metaphor for the lifecycle of ideas. The central piece represents the godhead of this virtual world, who interfaces with the world through her four Aspects, represented by the four surrounding pieces. Each Aspect interacts with information in a unique way, analogous to the different modes by which we all process information: whether we are crafting an object from a plan, making something unique and new, recommending a show to a friend, or reading a favorite book. 

The conceptual arrangement of the the five pieces in the Aspects series.

I - The Engineer

I, graphite on paper, 8x10", 2015

The aspect of practical creation, infrastructure development, and tool making. The start of the information cycle, she creates empty Orbs - vessels for knowledge.  I wanted to capture the sense of meditative peace that comes from replicating a known design - the state of flow that creators and craftspeople achieve is one of my favorite emotional states.  The little gooey pod that she is drawing the materials for the orbs from is the same as the small pods present in Zero, to give you a better sense of scale.  The "off-screen" connections point toward Zero, like life-lines, but the material for the Orbs comes from the ground, where IV consumes information (the Orbs themselves are woven from patterns/information Zero consumed earlier).

II - The Artist

II, graphite on paper, 8x10", 2015

The aspect of creativity, embracing the strange. The second stage of the information cycle, the Artist fills the Orbs with Stories, art.  The source of the Stories are unknown, seemingly pulled from the ether. Stories, in this sense, are not necessarily "art" oriented, simply context for a set of facts.  A specific technique for sharpening a chisel and how that affects different woodworking tasks; a mathematical proof explaining how a set of basic principles leads to definite conclusion about the state of the world; or simply a poem: these are all new bits of information which may or may not be incorporated into the world (not all great ideas are seen to fruition, and of those that do see the light of day, fewer still catch on in a mass media sense).

III - The Curator

III, graphite on paper, 2015

The aspect of deep searching, exploration, and seeking new ideas. The Curator sifts through stories, separating wheat from the chaff.  Unlike the other Aspects, III has the capacity to reach out into other worlds - the ability to analyze the outside world and bring in Stories from other worlds/perspectives.  We often rely on the opinions of others to help point us toward ideas, because without external viewpoints, we are locked in the echo-chamber of the self.

IV - The Consumer

IV, graphite on paper, 8x10", 2015

The aspect of learning and insight. The Consumer strives to understand the world and develop empathy by observing the stories and ideas of others.  Experiences, both firsthand and vicarious, can acquaint you with an Idea.  Learning through experience and feeling with your own senses seems the best way to learn of the world; however, our senses and memories are fallible, limited in scope.  We can only see a very small band of the electromagnetic spectrum. We cannot (without technological aid) witness the vast majority of interactions that happen in the Universe as a whole -  when we look to the heavens, it looks mostly empty to our eyes.  Because we are all limited and fallible beings, be skeptical of the information you take in, and take time to reexamine your thoughts and feelings for the same reason.

0 - The Arbiter

0, graphite on paper, 16x21.75", 2017

The being responsible for this virtual realm, both creator and breaker of patterns. Each aspect interprets the Arbiter in each of her roles in the cycle of ideas (Engineer,Artist,Curator,Consumer).  This piece is more than four times the size of the individual Aspects pieces, incorporating aspects (haha) of each of the Aspects. There are tiny caterpillar II's in the branches, Zero's body full of Orbs, has both less than and more than the expected number of limbs.  But unlike her Aspects, Zero wears no armor, is not constrained by the standard border (hence the arc on the top and the bottom), and has power over the shape both the world and the interface that views it (the right hand, specifically).  Even her name, 0, breaks the Roman numeral pattern of her Aspects' names.

Violence

There seems to be no end to the violence we hear about in the news, in our entertainment, and throughout human history. Always a clash between unyielding personalities and ideologies.  Violent ideologies use dehumanizing tactics to distort our views of The Enemy until we forget their humanity... and our own.

Violence, Antipode, Graphite on Paper, 5x7", 2017.

Time Lapse Video - diVision

I spent some time over the last couple weeks learning how to use Premiere Pro (I am a Adobe CC subscriber for Photoshop, Lightroom, and Illustrator (and a few others), so it wasn't an additional expense for me) and put together a short timelapse of my newest illustration, diVision, with original music I wrote specifically for this video!

It is my hope to continue to produce time lapse videos of my creation process in both illustration and origami, each with original music, at a rate of at least once per month.  I will be trying other formats, like tutorials and explanations of artistic intent, or even q&a's if you'd like.

Antipode, diVision, graphite on watercolor paper, 5x7", 2017

Based on an earlier sketch I did.

Antipode, untitled sketch, June 26, 2016 (wow, that was almost a year ago!)

Antipode, untitled sketch, June 26, 2016 (wow, that was almost a year ago!)

Acquiring New Skills - Paper Making!

I recently attended a small workshop of Eastern style paper making at Pulp & Deckle, featuring Japanese mulberry (kozo), Japanese gampi, and Philippine gampi.  There was also an experimental mix of wheat grass and kozo, which isn't foldable, but pretty cool looking.

Left to Right:  Three sheets of Philippine gampi, 11x17"; one sheet of wheat grass with kozo; one sheet of kozo and Japanese gampi blend, 8.5x11"; two sheets of kozo, 8.5x11".

Forming the sheets took a couple tries to get approximately correct.  A few of the sheets that I made turned out quite well.  The nicest sheet was the kozo/gampi blend, which was a pretty even distribution of fiber with a nice texture.

The paper was quite responsive to the folding, though was a tad too thick to go much further in detail level at this size.  I can't wait to be able to start making most, if not all, of my origami paper, because there will be great potential in creating texture and color.  Just need to figure out the right methodology for forming very large sheets (at least 28x40", to match the sheets I use for lamps).  Anyway, here's the little doodle I made with that sheet.

Front of Pattern

Back of Pattern

Start of a new drawing series

Work has begun on a new series of drawings.  There will be five pieces in total, numbered 0-IV to be displayed in a cross formation:

II

III         0         I

IV

 I-IV shall be 8x10" each and the center will be at least 16x20, though I may go larger.  I've completed the first two drawings.

"III" graphite on paper, 8x10", 2015

"II", graphite on paper, 8x10", 2015

I'm really enjoying working in this style, which is primarily influenced by Mucha, whom I've always admired, but never tried to emulate until now.  After putting my own spin on it, I'm not quite sure how to describe it.  Grotesque Nouveau?  If you have any ideas, let me know, because I'm pretty bad at describing my art to people.

And finally, because I enjoy these quite a bit myself, here are some gifs of II and III in process.


New Wood and Origami Lamp (with design notes)

Keeping with the imaginative and descriptive naming conventions for my lamps, I present Lamp 06.

Lamp 06 - Mulberry paper, maple, walnut, tung oil finish.  7x18", 2015.

Currently, the walnut dowels are removable so that the pieces can be boxed separately for shipping.  I worry that if everything is glued in place, rattling and impacts during shipping may damage the dowels.  Still thinking about the problem and there may be changes before I list this lamp for sale.

Slightly disassembled (dowels are fully removable).

For those interested in the design and build process, read on!

Last summer I sketched out an initial design for a pentagonal lamp with box joint joinery.

I worked out the rough dimensions and figured out the various weird angles and determined the teeth order on the joints (with an even number of sides, each side is typically a reflection of the previous side for teeth alignment, but for an odd number of sides, each side must be cut identically).  I was able to make a homemade jig for cutting the box joints and it worked adequately, but making fine adjustments was difficult and setup was time consuming.  The woodworking was put on hold and I put my work towards more origami designs until I could get my hands on a more reliable jig.

Square grid tessellations take considerably less time to fold than triangular grids. The number of simple devices for a square grid is small, but there are some interesting arrangements of squash folds and sinks.  The below devices form the basis of my overall pattern designs.

Two designs I used as the basis of the final design.

The width of the final design, measured by grid units, is evenly divisible by five for the pentagonal base (each face is eight grid units).  Here are a couple gifs that show the full pattern (which I neglected to photograph before the the final glue-up).

Once the design was folded and affixed to five panels of styrene, the form lacked stiffness because it has no natural tension to hold it's shape as cylindrical forms have.  I bent some pentagons out of 18 gauge copper wire and glued them into the top and bottom borders, which solved the form retention problem.

The most soldering I've done in years.

Glued on borders with copper reinforcement.

Once the origami shade was complete, I shifted focus back to the woodworking. I purchased an Incra iBox jig and set it up to make normal box joints.  After calibration, I started thinking about a modification to the fence to make the pentagonal box cuts with proper support for the stock.  The modification was very simple - four 18 degree spacers glued to a 1/4" thick piece of MDF and fastened to the jig via some T-nuts, bolts, and knobs.

The modified jig.

There is a problem with this setup.  Normally when cutting the teeth for a box joint, you need to flip the board around to cut the other teeth, but that would have the part leaning toward the jig at the top instead of away from the jig, which means the bottom edge (the one being cut) would not rest against the key.  My solution was to cut the pieces to proper width (normally done as the last step) and then key from that new edge.  Unfortunately, I was very slightly off, so when I went to assemble the box, the first and last pieces were off alignment by about a 1/8" (over 16 1/4" inches, so about a 1.5% error).  The pieces to came together with no unseemly spaces during the dry fit; however, during the glue up, I used regular Titebond wood glue (which doesn't have a very long worktime) and was unable to force everything into perfect alignment.  It was necessary to fill some of the gaps with wood filler, but it is only really noticeable when inspecting it very closely.  Still thinking of a proper method for eliminating that error.  Will post it to this blog when I figure it out (unless one of you has an idea, in which case please share!).

1.5% error!?  *shakes fist at sky*

After assembly, I lightly planed the joints flush and then sanded everything by hand using 60 (sparingly), 100, 180, and 320 grit paper.  For the finish, I used two coats of tung oil.

The hearts were put up during a party, but I left them on BECAUSE I LOVE HEARTS.

The finished product is something I enjoy quite a bit and will be leveraging this design into many other similar pieces.  I do not plan on making exact duplicates of these wood lamps.  Right now, there seems to be enough variety in the types of wood and the origami designs I can create so that each can be unique.  If I run out of ideas, I reserve the right to make copies of course (which seems unlikely).

Abstraction[0] - Design Process

Abstraction[0] was finally installed in its new home at Hanh Solo!

From the entrance


There is quite a bit of planning and trial and error that goes into creating something you have no experience making.  I have been casually making origami since I was quite young, but didn't start pursuing it seriously until late 2012.  When I was commissioned to make a hanging paper sculpture of some kind, I honestly wasn't quite sure where to start.  I liked the idea of capturing a moment of transition, as I do in most of graphite drawings, so I started with a few sketches.

"Butterflies"
"GSD" (greater stellated dodecahedron)
There was a gravitation towards the spiraling cone pattern: the idea of pieces of paper 'falling' from the top of the piece and becoming folded as they spiraled downward.  I have always been inspired by the works of Akira Yoshizawa, the father of wet-folded origami (he also created the notation system you see in almost every origami book, cataloged all of the traditional designs, and almost single-handedly turned origami from folk craft to true art with his hundreds of beautiful designs).  

Wet-folding is simply folding paper while damp so that curves can be achieved.  Paper choice is very important here as most paper does not have sizing, which is a special water-soluble adhesive.  Non-sized paper will simple fall apart when wet, but sized paper will hold its shape.  As an added bonus, the sizing helps the paper rigidly keep the wet-folded form when it is dry.  An origamist can either used a sized paper, like some water color paper, or add a sizing agent like methylcelulose to unsized paper.  I bought up several different types of water color paper and tried folding some test forms.

Cutting squares and writing the type of paper on each
Test folding
After cataloging some data, with some very nice and some not-so-nice paper types, I settled upon a type and bought a large roll of it.  Then came a brief meeting with the Caroline (the commissioner) at her salon and it became apparent that my initial designs weren't going to work for the space (in a spatial sense).

Ugh.

I definitely had a freak-out moment, because I had done quite a bit of planning (even developing an equation using Mathematica to describe the perfect Archimedean spiral for the pattern) that could not be used anymore.  Thankfully, inspiration hit me quite suddenly, and I got a very vivid image of a curtain-like structure that would be long, but not wide.  Later that day, I sketched this up and then waited for the roll of water color paper to arrive.

Initial sketch
From here, I knew that these large pieces would take some serious practice to get the right look.  Nothing to do but cut some large strips and start!

Cutting some strips
Initial folding
Additional shaping
This first strip taught me quite a bit.  The paper was drying fairly quickly, so it wrinkled quite a bit.  And I had to get quite creative with finding bits and pieces to hold the paper in place while it dried.  The clips at the end are holding the paper in place around a wooden dowel, which will be the top of the top of the piece.

I cut some small holes near the wooden dowel and wrapped 18 gauge copper wire around and hung it up.  It looked pretty much as I intended, so I went about creating a couple more panels and then spent quite a while looking at them, trying to figure out what I liked and disliked about the spacing between the pieces, the positions, the copper wrapping, etc.

The first three panels
Mostly happy with the way these panels turned out, I started work on the rest of the piece.  I wanted to create this feeling of the panels "falling to pieces" or being "digitized" or some otherwise deconstructing around the focal point (which was going to either be a tetrahedron made of a bunch of tetrahedrons or a Sonobe module icosahedron).  To achieve this, I just starting cutting the strips to pieces before wet-folding.

Cutting the strip
Shaping and drying (need to get more flat surfaces...)
Tetrahedrons, and some 'mid-fold' pieces
At this point, I was accumulating quite the pile of shaped paper of various sizes, and it was time to start working on the wooden base.  The idea behind the base is to hang all of the pieces to that so that the entire structure could be moved instead of having to spend a lot of time hanging the pieces directly to the ceiling of the salon.  I didn't want to have an overly complicated design to take attention away from the paper, so I settled on a box shape (which is also appropriate for my current skill level in woodworking...).

Base with brass hooks installed
Next I built a support structure of 2x4s to make it easier to transport and then hung the pieces in place.  I used a 1/64" drill bit to make tiny holes for fishing line and started stringing pieces into place.

Early in the hanging process
It took quite a bit of time to find the right pieces and positions.  There is quite a pile of scrap paper from pieces that just didn't work.  In fact, the first panel didn't make it into the final piece.  Hopefully the next piece in the series will involve less waste paper to recycle in the end.

There aren't photographs of the final steps in the process, but it was mainly just iterating the previous steps anyway.  The one major revision that I made was removing the copper wire and re-wrapping everything with brass wire.

It was a bit surreal to walk into the salon today to install the name plate and take photographs of the final installation (I forgot both the name plate and my camera when it was initially installed a couple weeks ago), but I'm glad to have gone through this process.  There was a lot of stuff to learn and I'm eager to move onto the next abstraction.

MOAR LAMPS

Still working on a post about the creation of the Abstraction[0] sculpture.  Also, I am making new tessellation lamps.  So many ideas for patterns!  Here are the most recent lamps (Lamp 03 and Lamp 05 are currently available in my etsy shop):
Lamp 03

Lamp 03 - Detail
Lamp 04
Lamp 05

Lamp 05 - Detail

And plenty more new designs to come!  I've been making origami tessellations for almost a year now, and I finally feel like I'm getting an intuitive feel for how all of the folds and flaps interact with one another.  The design process is getting much easier (though I still haven't tried making a crease pattern for any of my designs) and the folding itself feels fluid and natural.  Pretty excited to keep improving upon my processes and start making some higher quality lighting fixtures from scratch.

About Me

My name is Sean Kirkpatrick, and I started Studio Antipode in March of 2013 as the framework for all of my artistic pursuits.  I have used the moniker of "Antipode" since 2000 and sign all of my pieces with a variation of that name: yes, I got the name from the fire and ice spell in the classic Chronotrigger, a favorite video game from my youth.

I primarily work with graphite drawings and origami.  My drawings tend towards the surreal and fantastic with an emphasis on realism.  My origami designs are abstract and geometric in nature (tessellations and psuedo-tessellations), though I am starting to design figures as well.  I am also creating functional multimedia origami in the form of lamps and am currently honing my woodworking skills to create other types of functional pieces fused with origami.

If you are interested in acquiring originals or commissioning works, contact me at sean@studioantipode.com.  Thanks for visiting!

Abstraction[0]

A friend of mine, Caroline Parker, recently opened up her own hair salon, Hanh Solo for Hair, and commissioned me to make a hanging sculpture.  We'll be installing it on Wednesday the 27th, and I encourage you to stop by to see it in person, and perhaps get your hair styled as well.  This is "Abstraction[0]".

Abstraction[0]
[These photos were taken in my home, in different lighting conditions than will be present at the salon, but it will give you a good idea of what the sculpture is like.]

Abstraction[0] is made of wet-folded water color paper hung with brass hardware on a wooden base of maple boards and birch plywood.  It measures 17W x 54L x 42H inches and will be hanging about 7-8 feet above the ground in the salon.

Detail.  Paper wrapped around wooden dowels and held in place by brass wire wrappings.

Detail.  The Sonobe icosahedron.
I hadn't done anything like this before, and the research and development process was quite an ordeal.  I had to test fold a lot of different types of water color paper to get just the right look, and then made quite a few mistakes learning to create a billowing, wind-blown look.  Soon there will be a blog post about the design process, including photos of the finished piece in place at the salon.  For now, here are some additional shots.


P.S.  Abstraction[] will be a series of sculptural pieces, hence the array-style name.

Trip to Ohio - Part 2

I completed this drawing a couple months ago while I was visiting friends and family in Ohio.  I figure it's been a while since I've written anything on this blog (sorry!) and wanted to share this for those of you who may have missed it on my facebook page.
The Watcher (2013) - Graphite on paper

One day, I was conversing with a friend who informed me that the Portlandia meme of "Put a bird on it!" translates to actual art sales for Portland-based artists.  I laughed a bit, but figured that it could be a fun project and I decided to draw the above.  #putabirdonit indeed.

Originally, I planned on making a quick 6x8" drawing as an exercise.

The Watcher - Draft

But after these few strokes, I really enjoyed the design and decided to do a larger scale drawing (10x14") so I could capture a lot of detail.  And here are some in-progress shots, just so you can see how it all came together.


I've been quite a fan of spirals and helices for a while and it was a joy to finally create a tranformative helix of a kind.  'The Watcher' is yet another fantastic creature from the same world as 'Necromancy' and 'Slipping Away' and I hope to revisit that place throughout my career.  Something very soothing about drawing the Webbing that literally connects all beings in that world.
Creative Commons License
This work by Sean Kirkpatrick is licensed under aCreative Commons Attribution-NonCommercial 3.0 Unported License.
Based on a work at www.studioantipode.com.

Trip to Ohio - Part 1

I haven't posted in a while, because I was visiting friends and family in Ohio for a few weeks.  The trip wasn't entirely unproductive, though.  I brought with me a stack of triangular grid paper, some commercial origami square paper, and one of my current drawings with me.  The challenge was thus:  create four new origami tessellations and finish a drawing.  This post shall focus on the origami side of things.

Creating a new tessellation - at this time in my origami career (...origami career?) - is about one part design and one part experimentation.  Quite a bit of my design time was spent trying to create psuedo-fractal patterns.  I started by drawing systems of triangles that spiraled out and became iteratively smaller, but the spiraling design I prefer creates a very unique problem that I haven't come close to cracking.  Once I make some headway and better define the problem I'll write a short blog about it - a very mathy blog post at that.  Though I was unable to create a fractal pattern, I became fascinated by triangular patterns and quickly folded this after a couple hours of finagling.

Triangle Tesselation 1.0

I really liked the way it turned out, though folding the smallest triangles are fairly complicated to fold very precisely.  It reminds me a lot of a simple trellis.  The same pattern was then folded on a larger grid (64 horizontal divisions), which turned out like this.

Triangle Tesselation 1.0, extended


This level of prototyping allows me to see almost exactly what my standard lamp template will look like, as I use a 64-division grid on my lamps as well.  Once I finally got back to Portland, I quickly folded this lamp from that design.

Lamp 02 (2013) - starched mulberry paper
The scale of this lamp is what I like the most.  I was able to make some long, crisp folds after the paper was starched, which makes for some very nice, sharp triangles.  For anyone interested, I have the lamp for sale on my Etsy store.

Unfortunately, I was only able to complete two more designs during my trip, and they look like this.


Star Flower ver 1.0
Star Flower ver 1.1

Star Flower 1.2

Diamond Trellis ver 1.0
The Star Flower pattern is fairly pleasing, but it takes a lot of time to fold and could still use some improvement.  Right now, the stars themselves run into each other and I think it could be improved by framing each star in a hexagon, as in the initial designs, or by thinning the individual petals (using more acute angles).  The Diamond Trellis also can use some refinement to "lock" the paper in place better along the horizontal axis.  It wasn't obvious that there needed to be refinement until I tried to wrap the test piece into a cylinder and all of the diamonds jutted out strangely.

Though I fell short of my goal of four new designs, I did make several more initial design ideas and thought about the process for developing some designs that are currently beyond my skill/patience.

On a final note, I started learning how to use a piece of origami design software called 'Tree Maker' by Robert J. Lang.  It's a wonderful, open-source, tool for making uniaxial bases.  An origami base is simply the starting point for a design.  For example, if you want to create a spider, you need a base with a minimum of eight 'flaps', one for each of the legs, and probably two additional flaps for the head and abdomen.  A generic mammal has a six-flap base (head, tail, four legs).  Without going into too much detail, all this means is that I am going to start designing representational models soon, in addition to the tessellations.  Hopefully I'll have the skill required to bring my visions to paper life, and I will be sure to share the results on this blog (if they are not too embarrassing).

Next entry will be about the drawing, 'The Watcher', I completed whilst I was in Ohio.  I have a few 'in progress' pictures to share, for those of you who are interested in seeing such a thing.

Creative Commons License This work by Sean Kirkpatrick is licensed under a Creative Commons Attribution-NonCommercial-ShareAlike 3.0 Unported License. Based on a work at www.studioantipode.com.

Origami Luminary

Since I started doing back-lit tessellations, I've been thinking about the best way to display the finished designs.  For me, the most obvious idea was to make lamp-shades and stand-alone lighting fixtures.  After some research (watching a Martha Stewart video and then ordering some supplies via LampShop.com) I went about designing and making this:

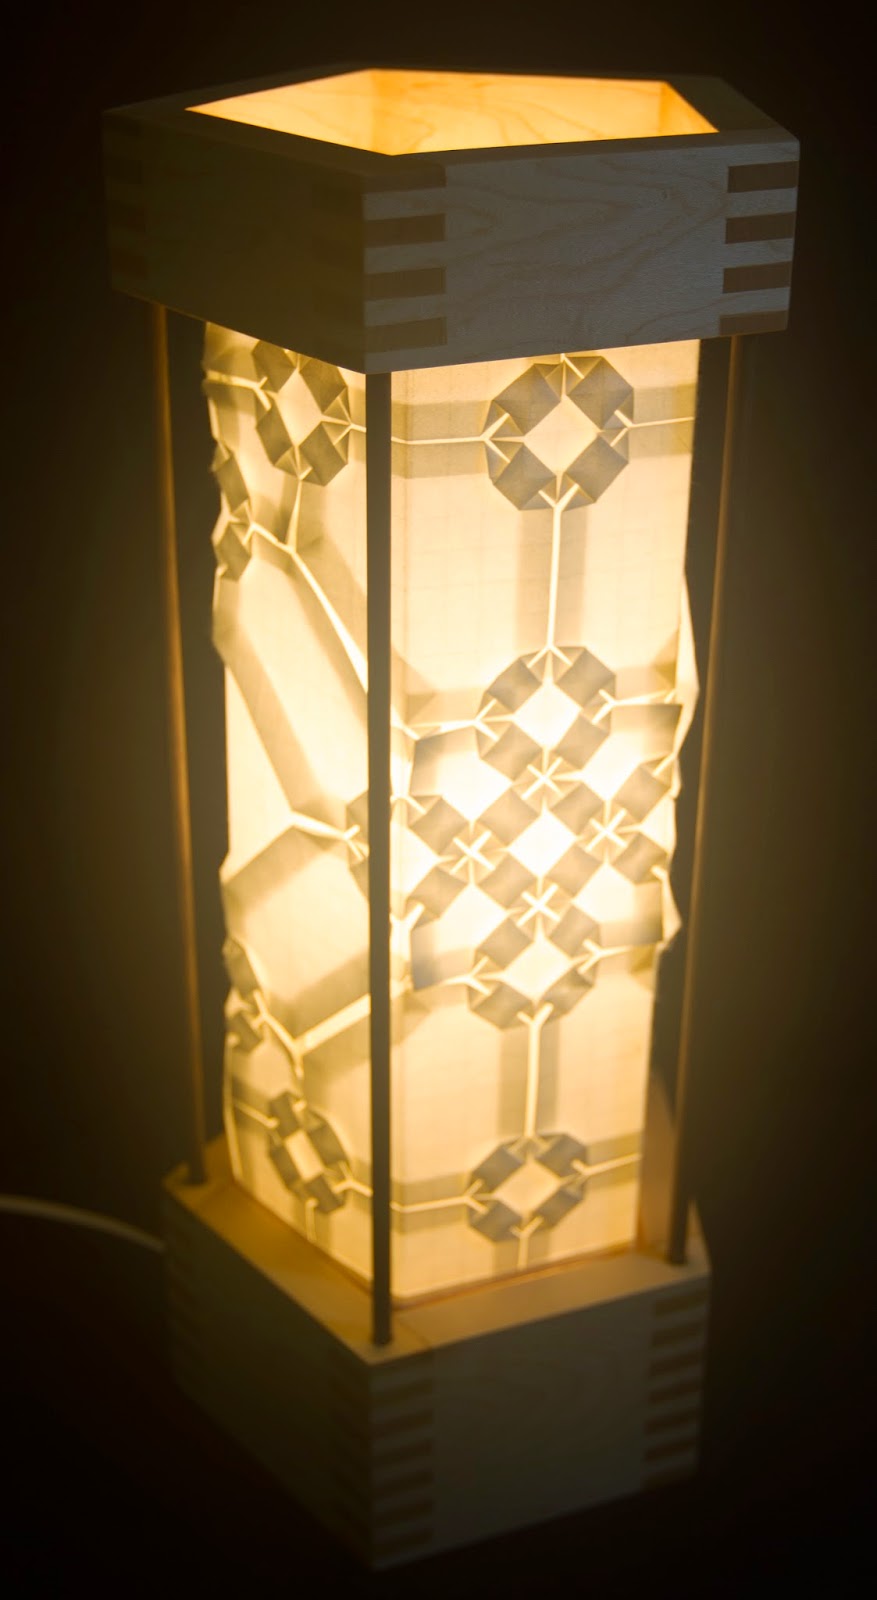
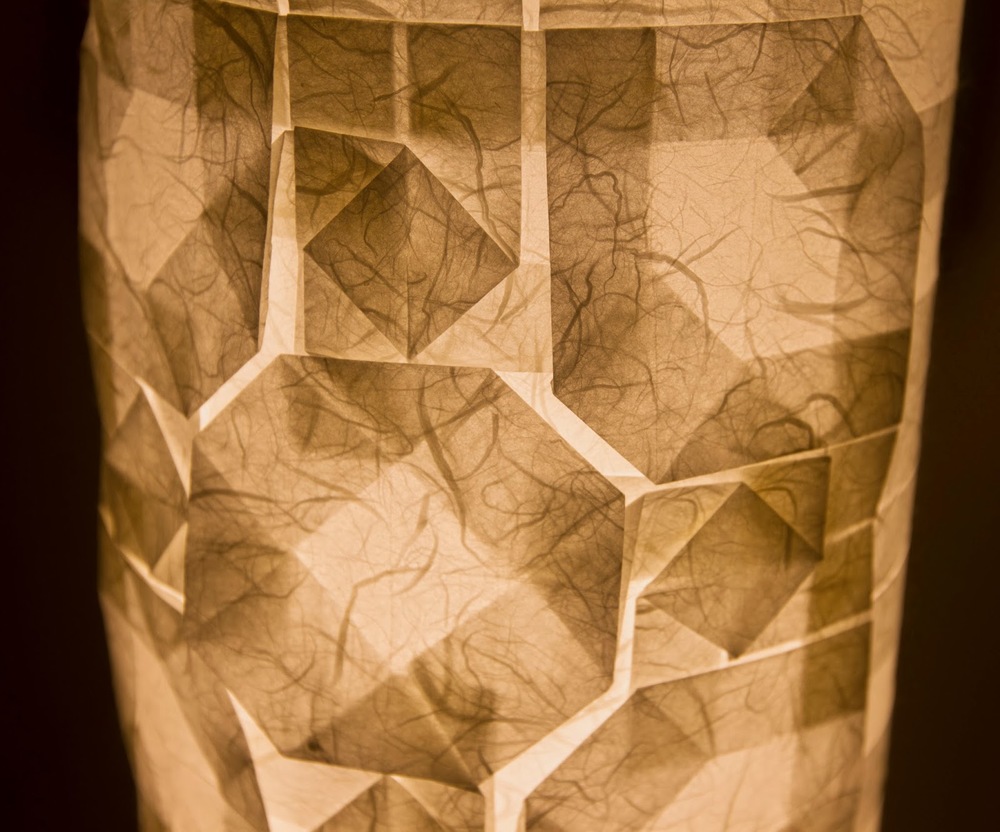
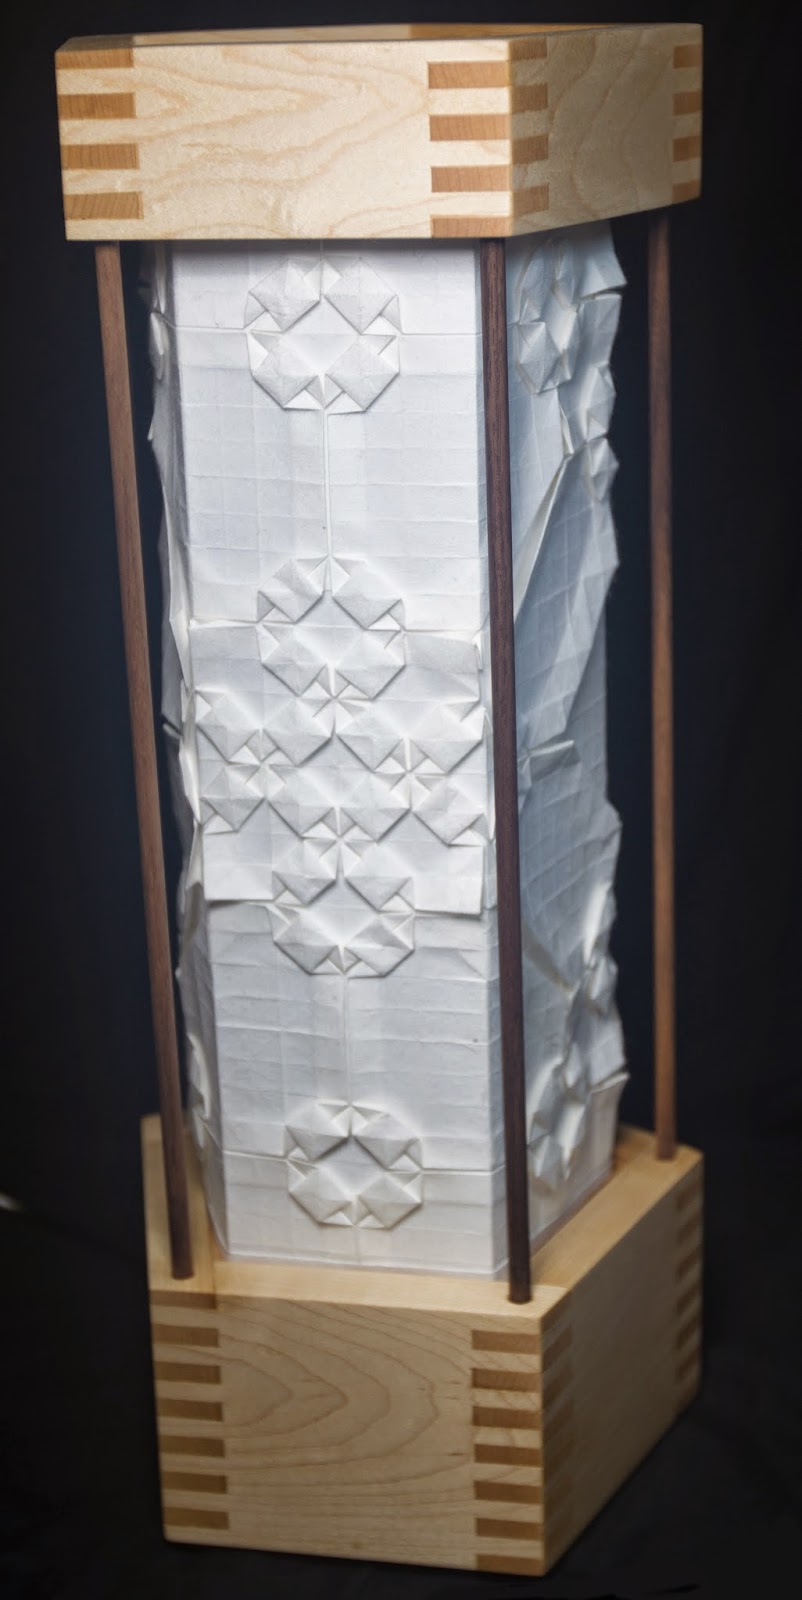
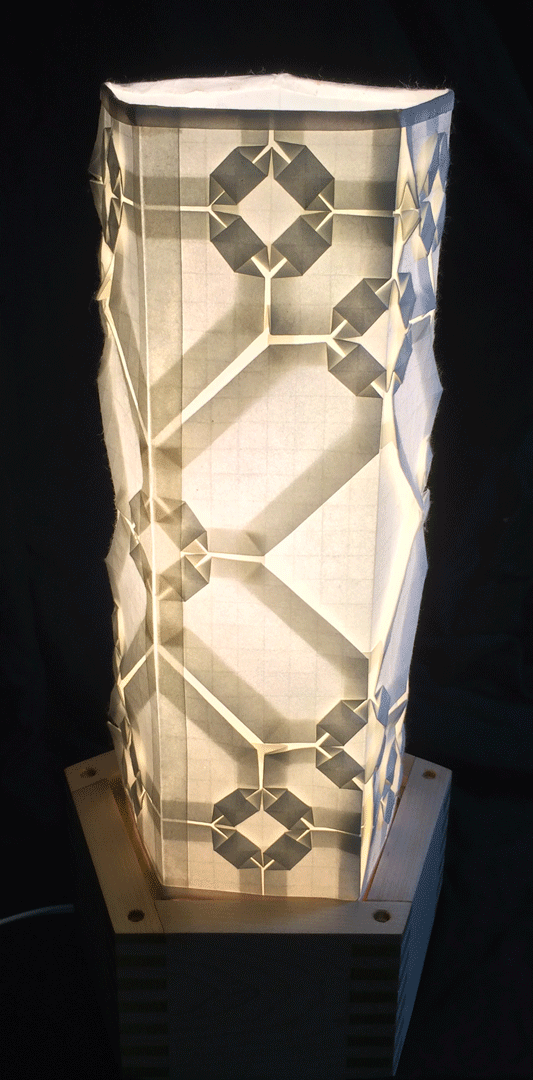
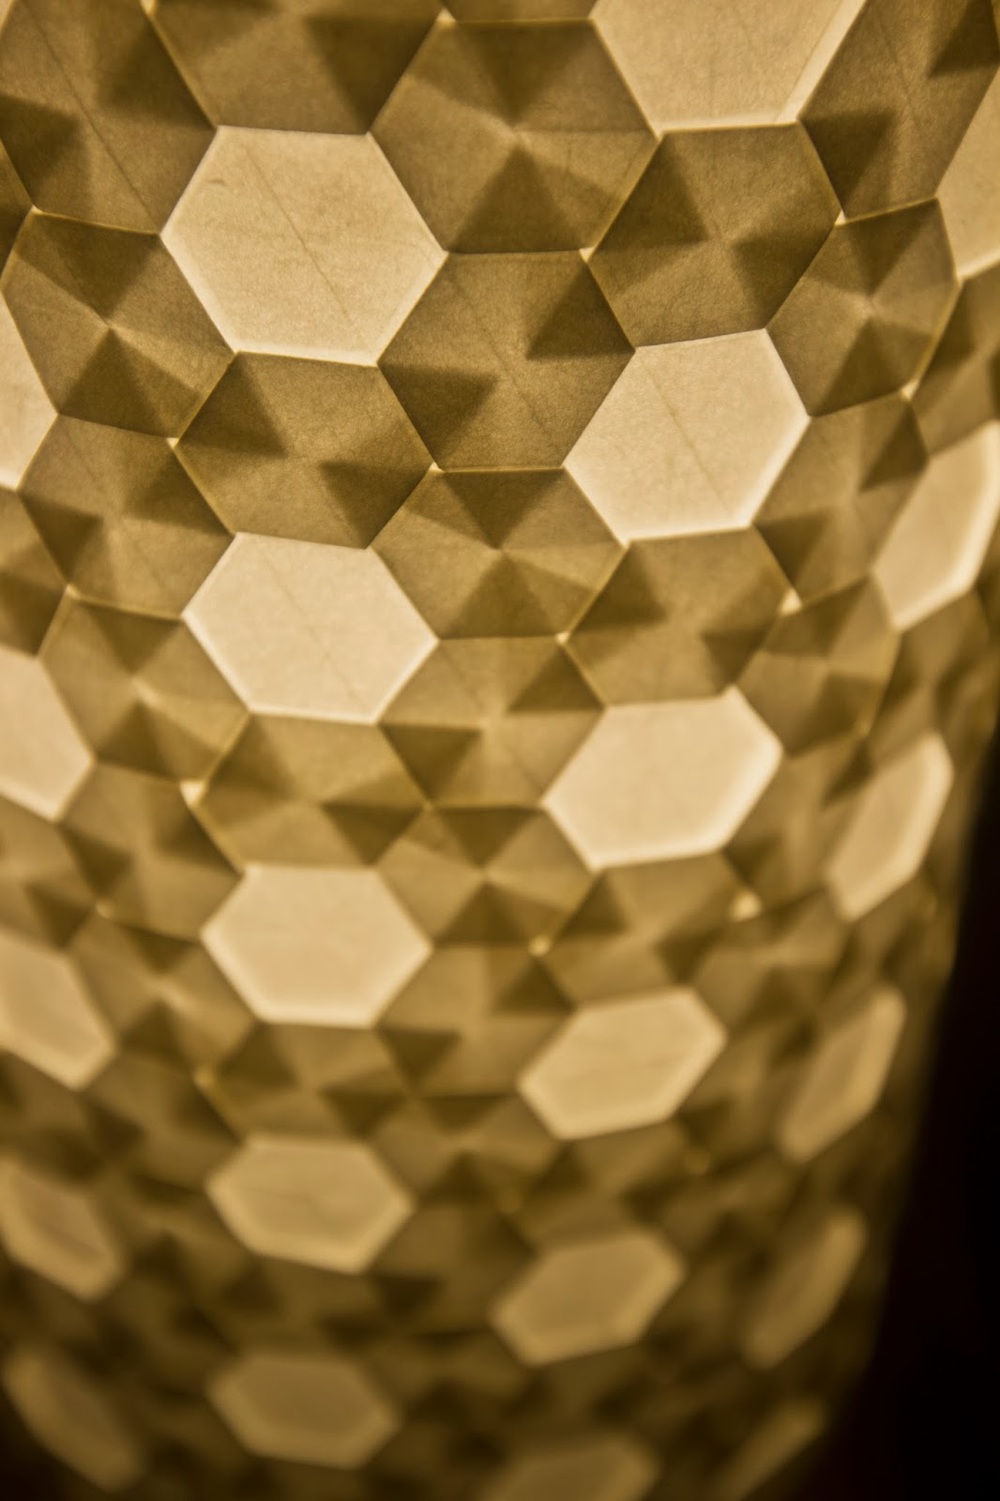
Hexagons and Triangles Origami Luminary by Antipode
This turned out to my liking and I plan on doing many others in the near future.  For those interested in the design/development process for this, keep on reading!

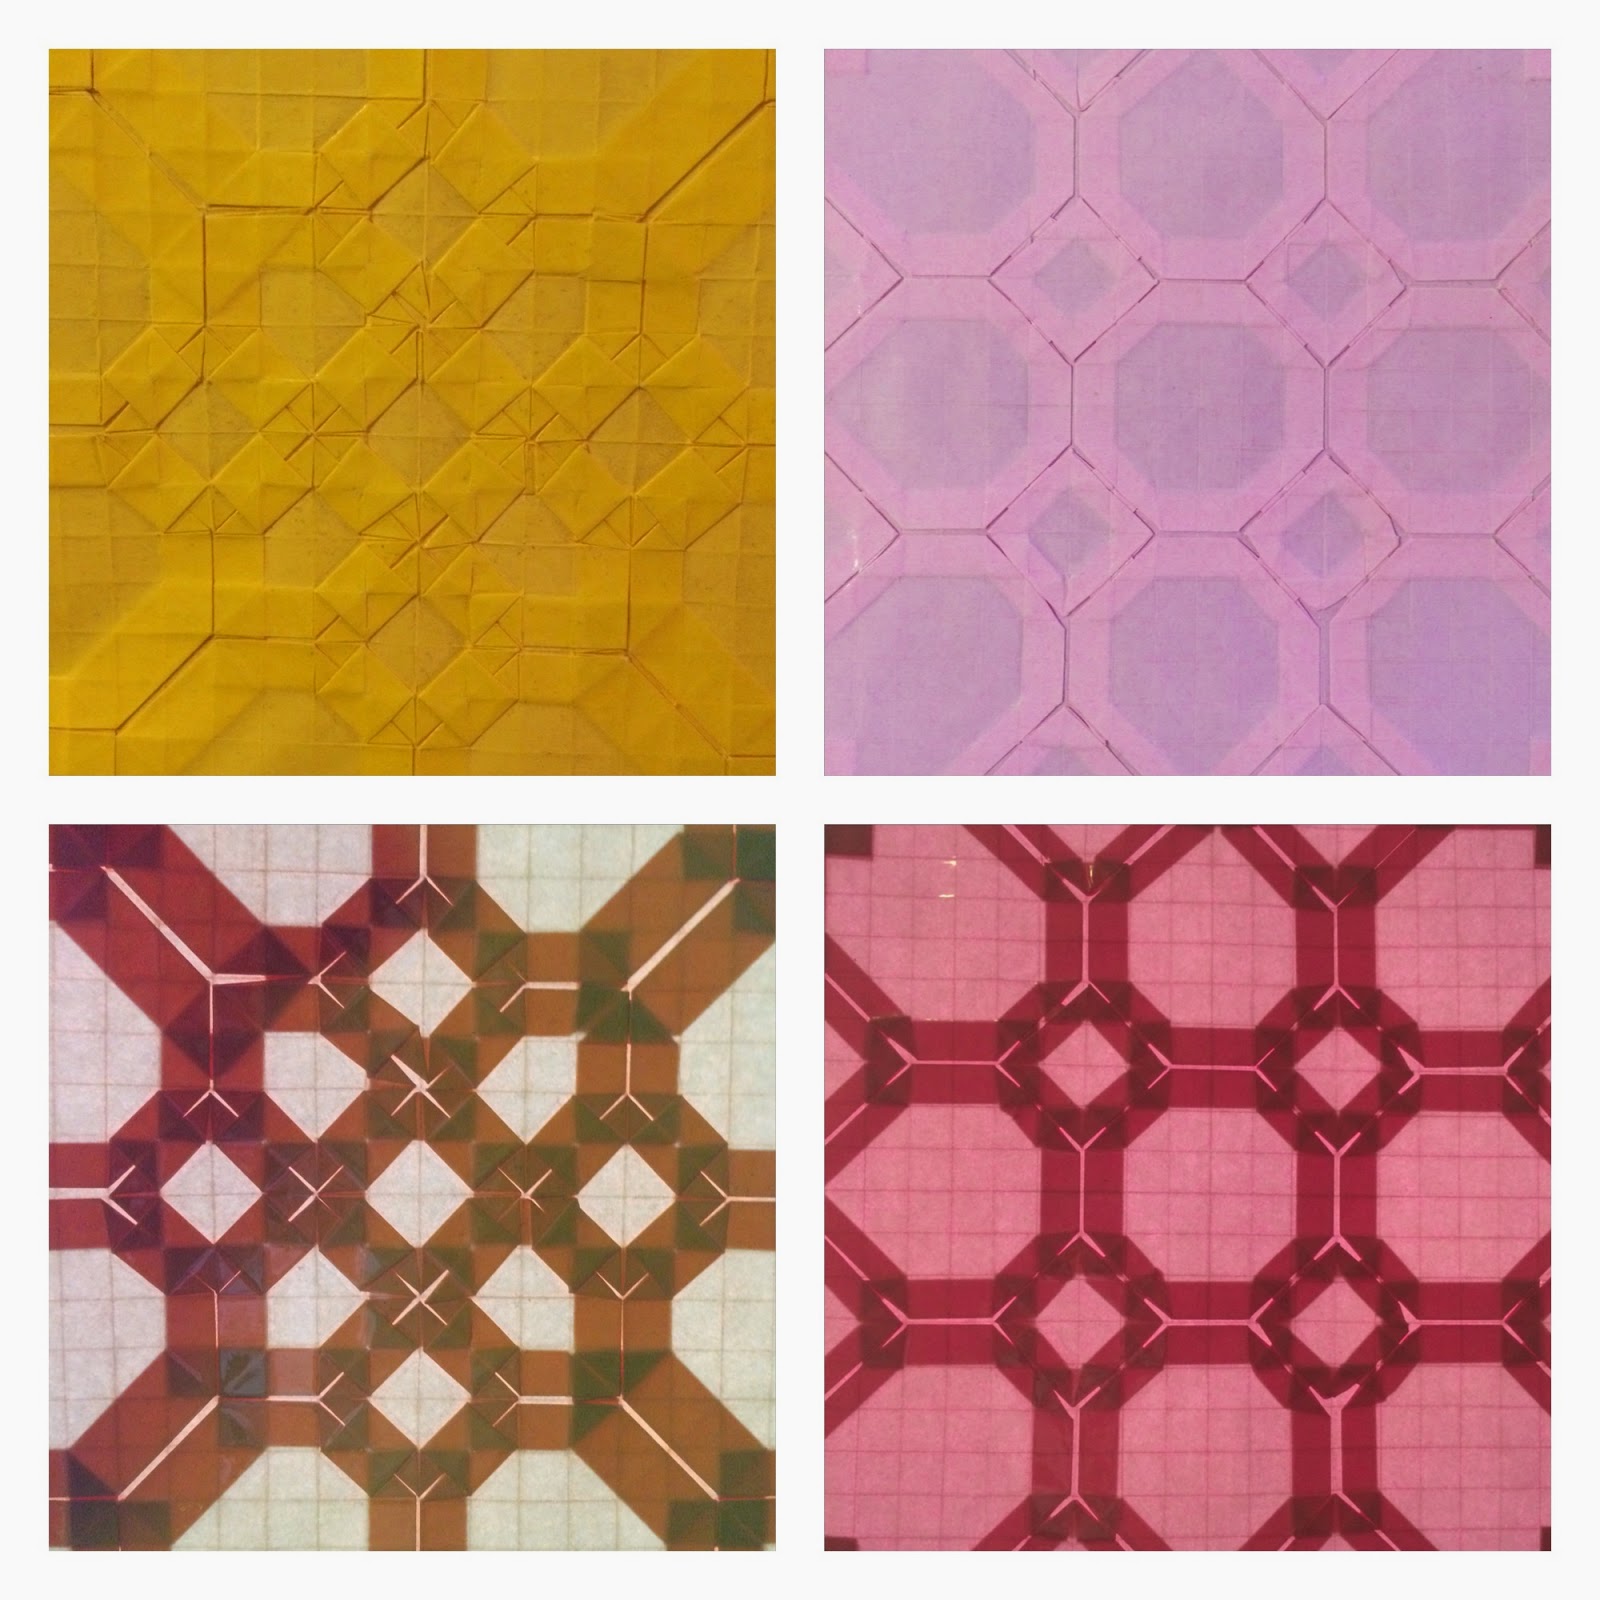
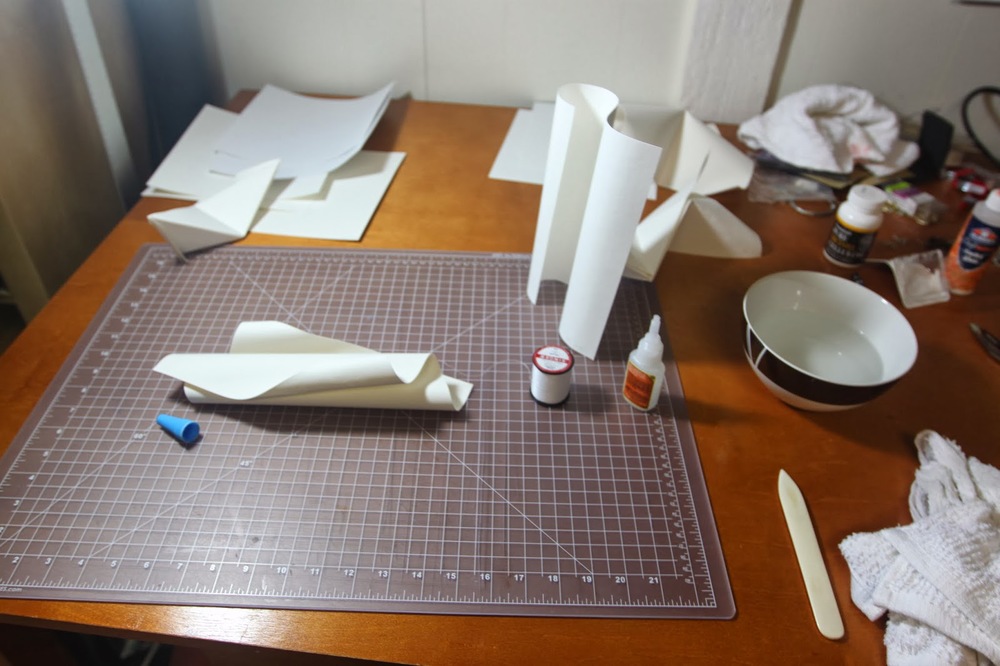
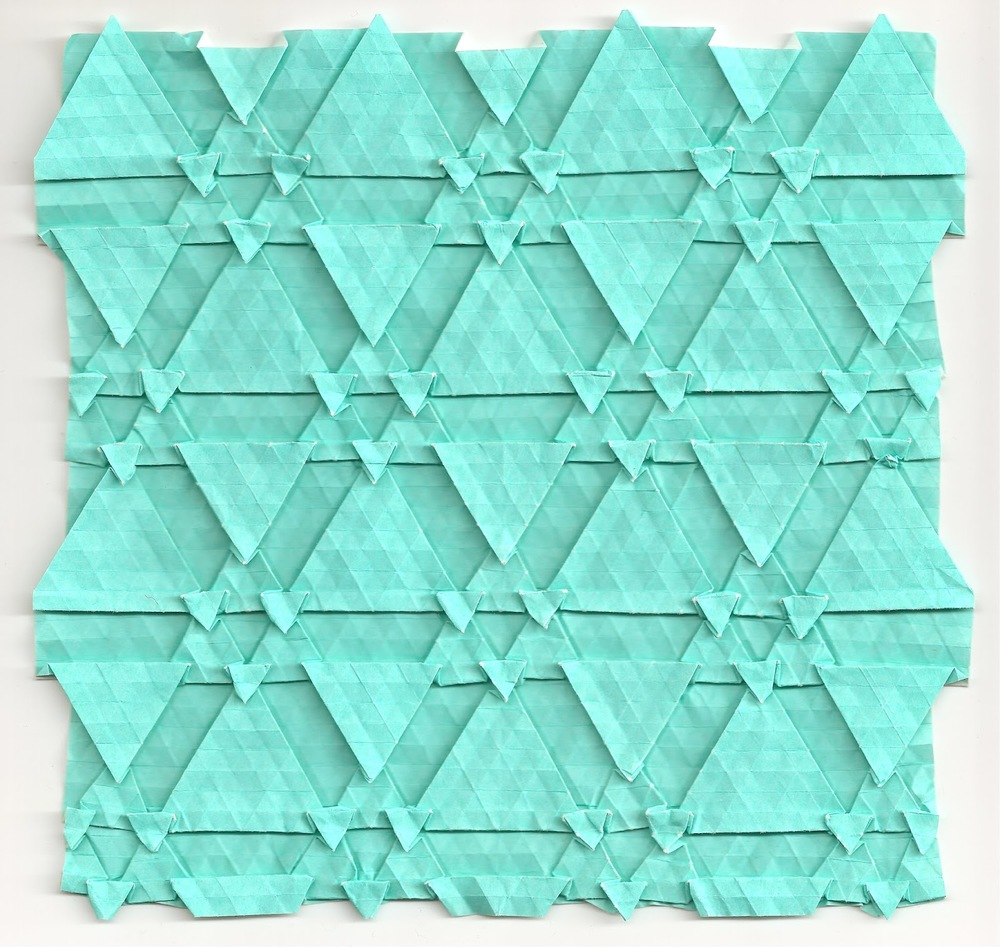
The initial plan was to make two identical luminaries, so I started by folding a triangular grid on two 0.5x1.0m pieces of nice mulberry paper.  It's a fairly soft, but very strong, paper.  Many origamists suggest using spray starch to stiffen the paper first, but I didn't read about that until after I had all ready folded two identical pieces... definitely going to give it a try next time.  I wasn't sure how the lampshadeification (it's a word... right?) would work with a more three-dimensional or sculptural tessellation, what with the curved-nature of the product, so I chose a very simple variation of the basic 3.6.3.6 and got to folding.

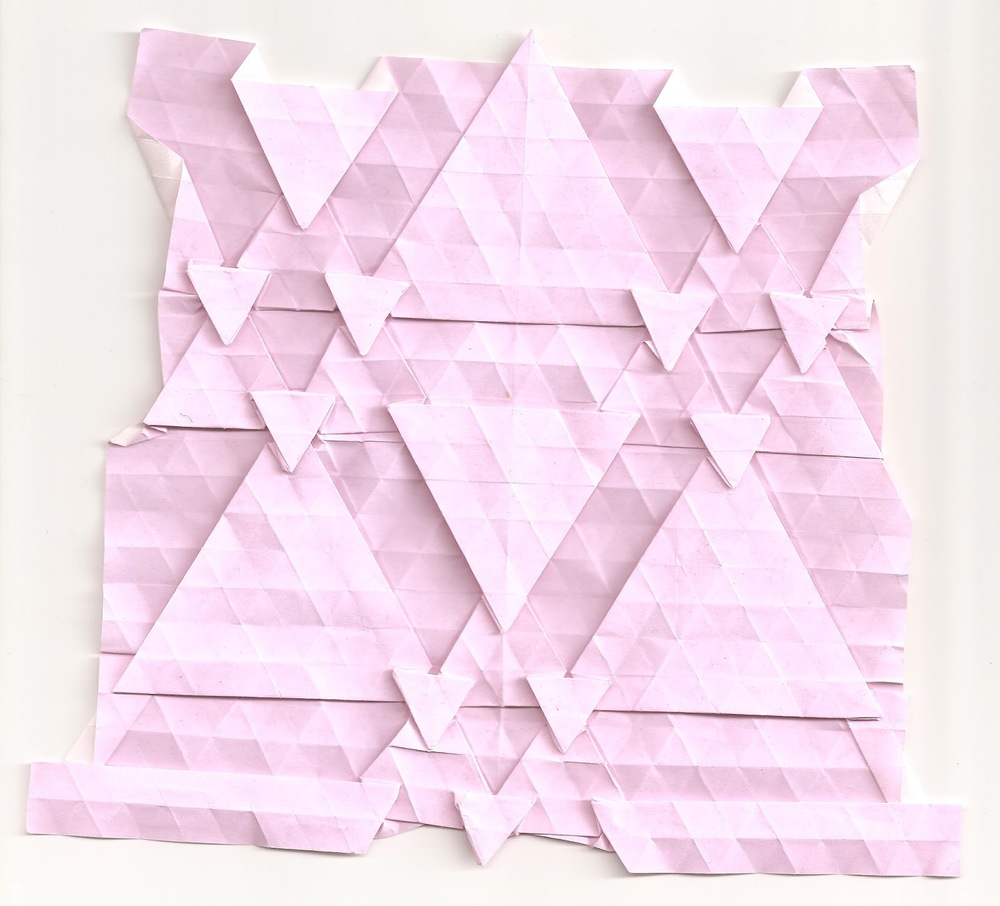
One of two completed tessellations
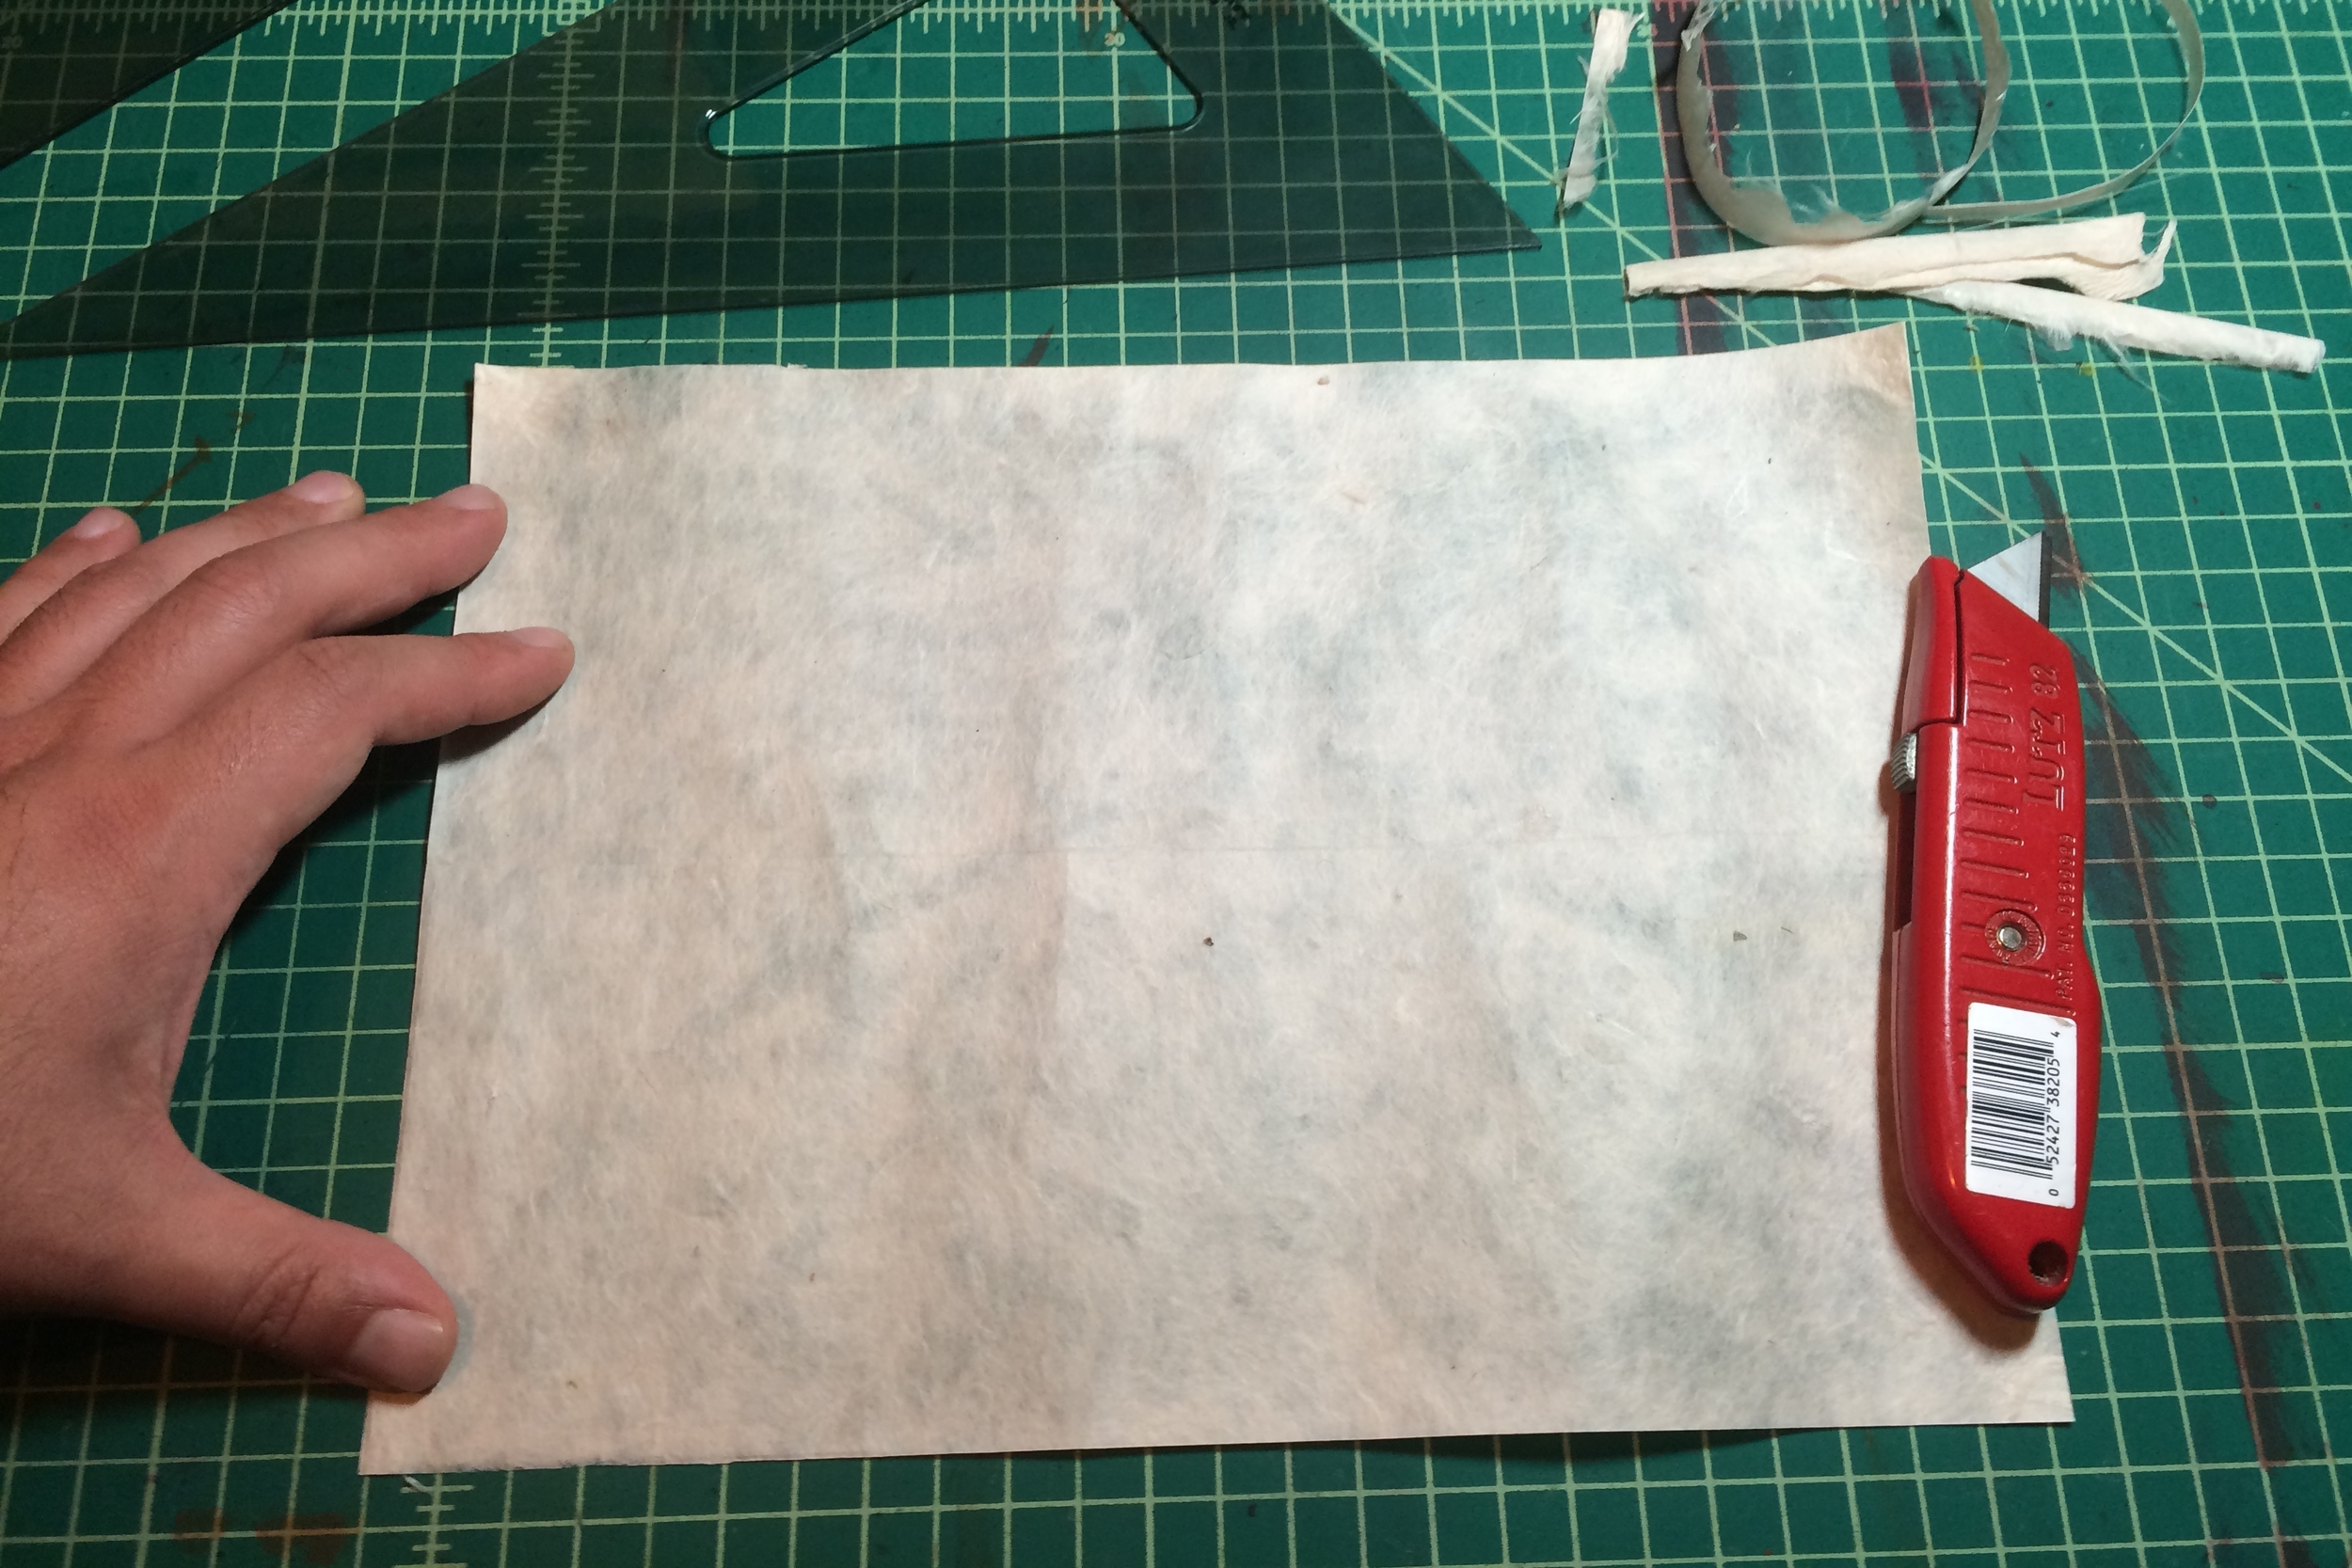
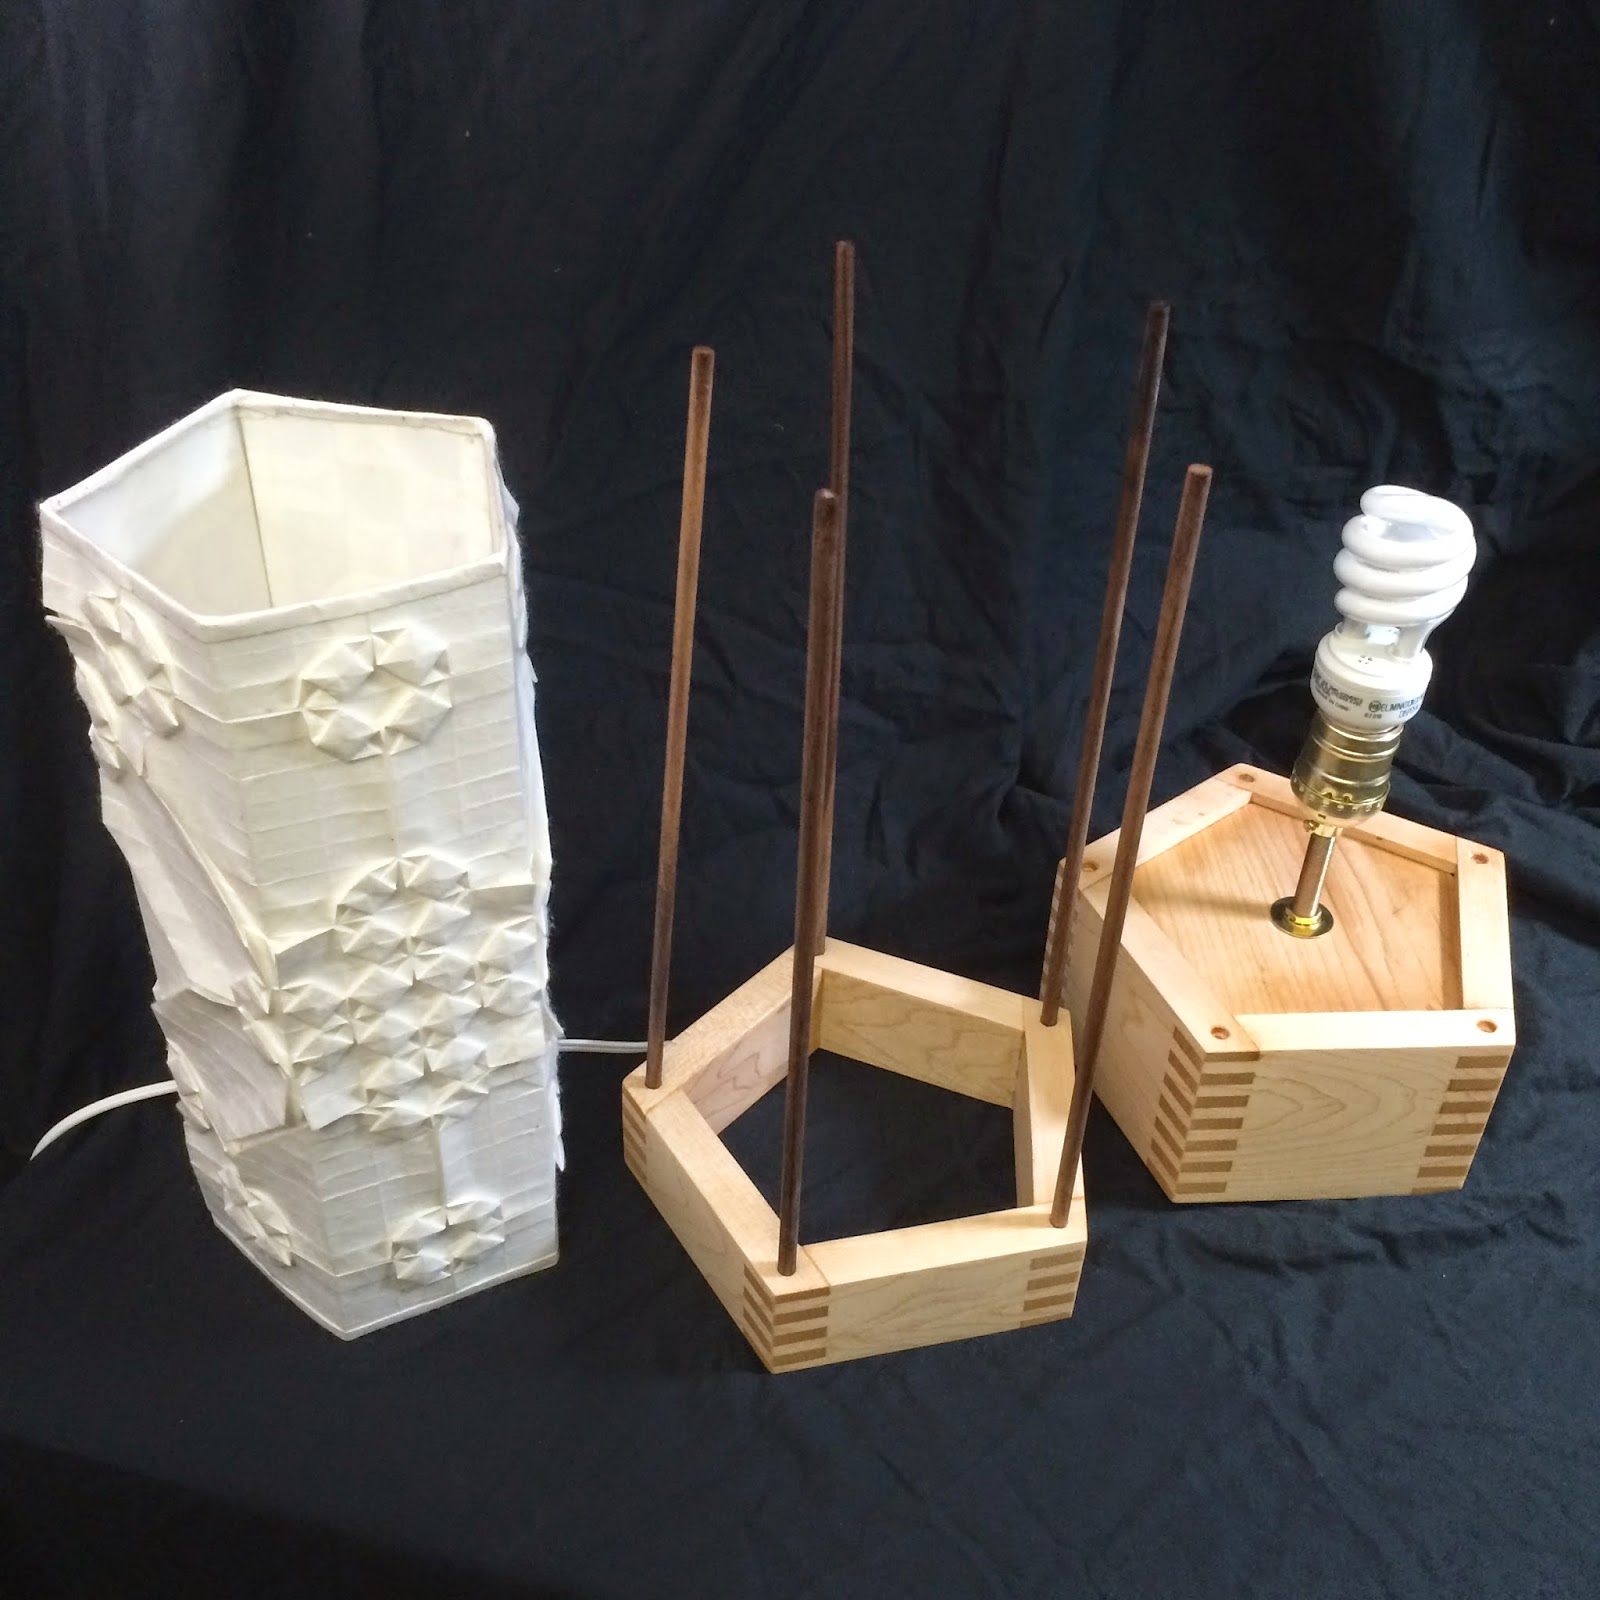
These pieces measure about 23x15".  There would have to be some overlap for gluing this into a cylinder, so I chose a cylinder size of 7" diameter, just about 22" diameter.  Side note:  22/7 is really interesting as a rational approximation of the irrational pi (see Diophantine Approximations).  I cut a piece of heavy weight styrene with adhesive backing to 22x15", pulled off the wax paper and carefully adhered it to the back of the tessellations I prepared.

Styrene-backed pattern
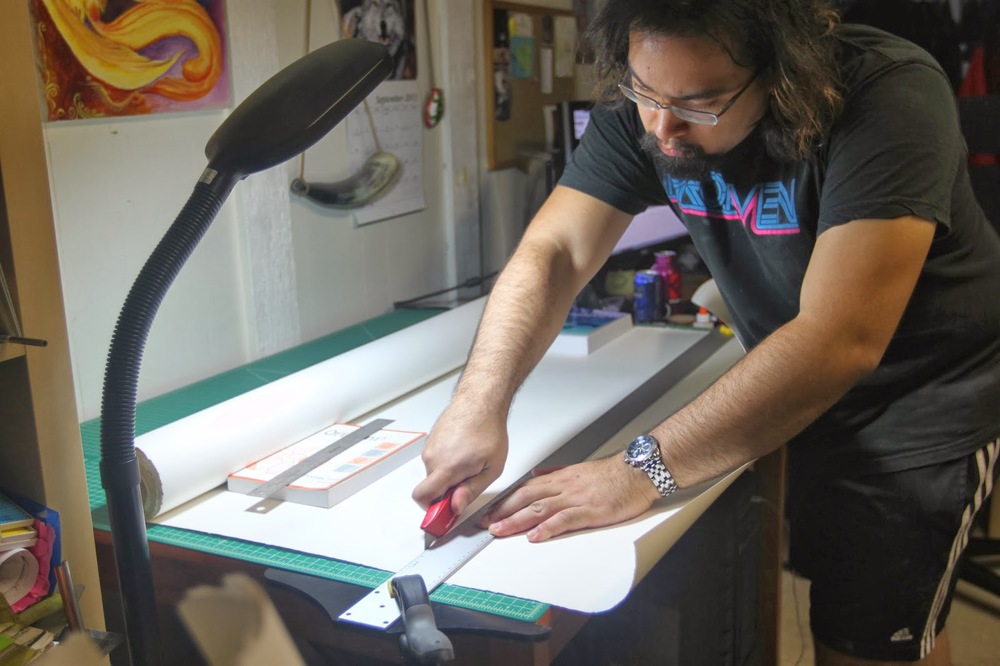
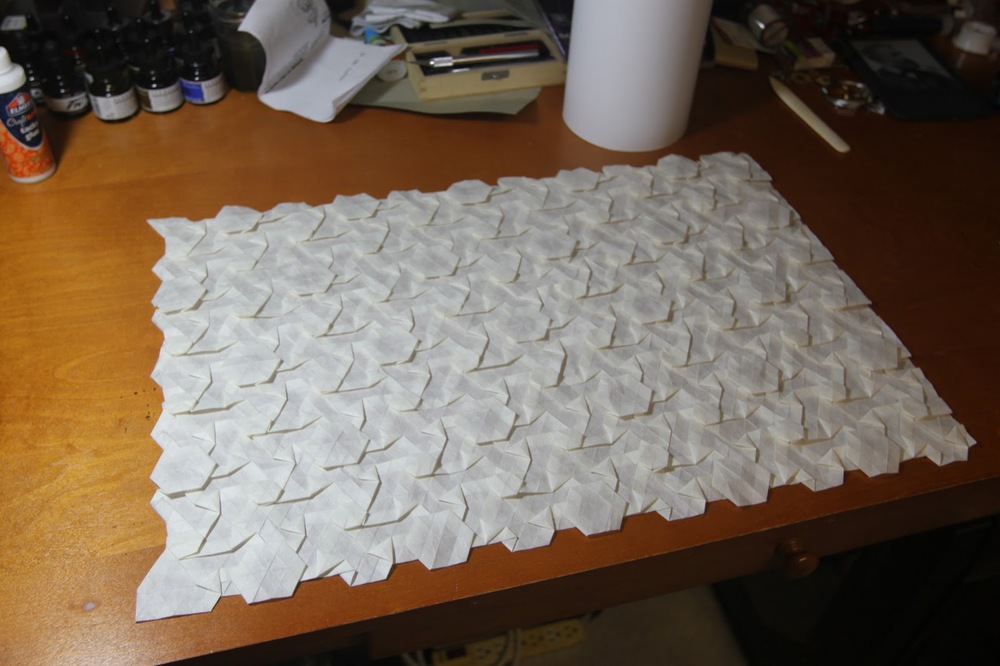
The process for styrene-backing the tessellation was pretty intense as the paper was kind of floppy and delicate.  The first styrene-backing went virtually perfectly.  In my attempt to photograph mid-process on the second pattern, however, I mis-adhered two sections, resulting in tons of wrinkles and basically ruined it.  Needless to say, I was frustrated, but I learned a valuable lesson about the process.  On the plus side, I could screw up on the rest of the process with that piece and be fine!

From here, I clipped the pattern around the top and bottom luminary rings, preparing to finally glue things into place.

Clipped into place

Gluing flaps over the rings
Gluing the flaps around the rings took a bit of trial-and-error.  Tacky glue is a weird thing to work with and I hadn't handled it before.  Thankfully, the internet exists and I was able to read up on a bunch of tips for gluing paper into place and how to specifically to best work with tacky glue.

Once both top and bottom rings and rear seam were glued into place, I got to affixing a ring of ribbon to the top and bottom rings to stiffen the join and provide a strong border to the top and bottom edges of the piece.  That turned out very badly, so I folded a thin strip of mulberry paper in fourths and used that instead of ribbon the the "good" luminary.

Top border
I wish I would have taken more in-progress shots, but that's all I got for the process.  In the end, I created two luminaries:  one is sweet and the other makes me cringe (but it was an important part of the learning process, admittedly).  I will definitely be creating more origami lighting in the future, but I think that I'm going to focus on drawing and sculptural/traditional origami design for the next few weeks.  Let me know what you think in the comments!

Creative Commons License This work by Sean Kirkpatrick is licensed under a Creative Commons Attribution-NonCommercial-ShareAlike 3.0 Unported License. Based on a work at www.studioantipode.com.